

1 Pound Plant Indoor is a DIY kit that lets you grow cannabis indoors. It’s easy, low-cost and will provide you with high quality buds in no time! This indoor grow guide has everything you need to start growing your own marijuana plants for weed today!.
The “1 Pound Plant Indoor” is a complete guideline for the best yield. The plant will produce 1 pound of fresh, edible fruits and vegetables per month.
Let’s be honest. We’d all want a gigantic cookie jar full with medications. And not everyone can get a single plant to generate a pound of fruit. This is precisely why you’ve come.
I’ll guide you through all you need to know to obtain the yield you want.
So, how do you acquire a yield of 1 pound plant from an indoor plant?
Indoors, with LEC grow lights, high yield seeds, grow tents, Stress Reduction Training, topping, and the proper NPK ratio, you may produce a 1 pound plant. Wonder Woman, THC Bomb, and other well-known seeds are examples.
That’s not all, however. You will also learn the rules of the games in this post for optimal progress. To get your desired outcomes, you will learn about the lighting, seeds, and caring procedures.
Let’s get started without further ado.
Consider the following:
If you’re new to cultivating cannabis plants, there are a few things to keep in mind. Before you go, you must do a lot of reading. As a result, make sure you read this carefully.
Is it possible to get a pound of produce from a single plant?
It’s almost hard to acquire a pound of produce from just one plant. You can surely get 1 pound from just 2 plants if you follow this method. This isn’t a joke!
Here’s an example of two plants producing around 18.6 oz (1.16 pound) when grown together.

growweedeasy.com is a good place to start.
It is, however, typically advised that four plants be grown. Why?
Because it is more efficient and cost-effective. People frequently end up cloning or multiplying their plants later on.
So, if you’re in it for the long haul, it’s best to invest a lot of money up front. You may simply extend afterwards. The equipment will not be moved.
In most places in the United States, you may cultivate up to four plants. And the majority of individuals start with four plants.
If you’re just starting out and have a limited budget, opt for two plants.
The game’s rules are straightforward once again. Grow the plant as large as possible and take good care of it. That is our objective!
Now we’ll go over some fundamentals. Before you get into the meat of the matter, you should be aware of the following. If you already know the fundamentals, you may skip to the next section (Step by Step Guide: Growing 1 Pound From Indoor Plants)
How Long Does a Marijuana Plant Take to Grow?
Growing a marijuana plant from seed takes roughly 10-32 weeks on average. As a result, you must be very patient during the whole stage.
Now, the length of time it takes for plants to grow varies based on the plant type or gene. There are many other aspects to consider, including as sunlight, fertilizers, and humidity. I’ll go into more detail about it later.
However, keep in mind that these external influences do have an effect on plant development. You may always use these elements to push your plant to grow quicker.
However, this might result in a poor yield. As a result, be cautious. We want the most out of each plant, after all.
What are the Stages of Developments of Weed Plants?
The cannabis growing stage is the most crucial aspect of this process. The methods you’ll use to care for your plants may vary depending on their stage of development. Each stage needs a varied amount of fertilizer, lighting, and other factors.
You must now comprehend the distinctions between each level. A plant’s growth phases are classified into four stages. Throughout the essay, I’ll refer to these phases often. As a result, make sure you are well-versed on plant phases.
Germination is the first stage.
If you’re beginning from scratch, you’ll begin here. Make sure the seed is firm and dry, and that it is dark-brown in color. This period might last anywhere from 3 to 10 days.
Your seed will eventually turn into a sprout. This means your sprout is now ready to be planted in the ground.
When moving the sprout to the soil, you must be cautious. Many individuals inadvertently harm the sprout. Your plant may perish as a consequence of the slowed growth.
I, too, have made such a blunder once or twice. Maybe three times.
As a result, I use the Homend Seed Sprouter Tray on a regular basis. This ensures that I do not harm the sprout. It’s a little investment that gives me peace of mind.
The root will begin to grow once the sprout is planted. You’ll end up with the little, well-known fan leaves.
This indicates that your plant has matured into a seedling. It’s time to move on to the next step.
Seeding (Stage 2)
This period lasts around two to three weeks. You’ll start seeing those green fan leaves around here. After the first week, you’ll see a gradual increase in the number of leaves. In most cases, each leaf will have 5 to 7 blades.
Clonex rooting gel is a must-have supplement. This little creature gives the young roots vitamins and hormones they need. During the seedling and Vegetative phases, you must utilize it.
To be honest, everyone has been taking Clonex, and the response has been great. Plus, this gadget is indestructible. 100ml Clonex will last approximately four years if you are cultivating two plants.
Congratulations if the leaves turn out to be a vivid green. Your plant is in great shape, and it’s time to go on to stage three.
3rd Stage: Vegetative
This period might extend anywhere from 3 to 16 weeks. This is where the true magic starts to happen. From this point on, your plant will need more light and water. You’ll also need to move the plant to a larger container.
You should also begin to top, train, or bend your plants. We’ll go through them in further detail later. One thing to keep in mind is that men and females must be distinguished. You don’t want them to pollinate your flowers.
Flowering (Stage 4)
This is where you will begin to see the fruits of your labor. This period lasts between 8 and 11 weeks. On your plants, you’ll see obnoxious buds forming. This is a sure sign that you’ve reached the blossoming stage.
Within 8-9 weeks, the most of the plants strains blossom. Cannabis pistils remain white during the start of the blooming cycle. The pistils become crimson after a few weeks, when the flower is in its last state. Some white hairs, however, may not become red. Excessive sun exposure and a high pH level are to blame.
Some other plants, particularly sativas, may require longer.
Growing 1 Pound From Indoor Plants: A Step-by-Step Guide
Now it’s time for the truth to be revealed. I’ll walk you through the procedure step by step so you can obtain the highest yield possible.
So, what are our objectives in order to get a yield more than one pound?
The first goal is to develop larger plants. We don’t want to outgrow our space. It’s the ideal size for getting the most out of your crop.
Goal 2: We’d want to see more bud masses that are the same size. There aren’t the usual few large buds that are prone to mold.
Step 1: Choosing the Best Seeds
Cannabis seeds come in a variety of shapes and sizes. But, after all, don’t we want the best? The following seeds, in my opinion, will provide the greatest results.
- So far, Wonder Woman has produced the best results.
- Chempie
- Gelato with cookies
- Africa’s Might
- THC Bomb
The dirt is something I didn’t mention previously. Feel free to create your own soil mixture.
But I’m much too lazy to do so. For the last several years, I’ve been using FoxFarm Coco Loco Potting Mix. It’s incredible.
This soil mix is a wonderful match for the fertilizers I use. I prefer to provide my plants the best possible conditions. And a whole lot of love.
And, fam, love isn’t cheap.
Step 2 : Selecting & Setting up Grow Tent
To begin, think about how long you want to spend on this. You’ll need long-lasting grow tents if you’re in it for the long haul. If you’re looking for a one-time employment, opt for something simple.
However, there’s no doubting that choosing the correct tent is critical to achieving a better yield. Here you can find the greatest grow lights and seedlings.
You’ll have to deal with humidity and moisture management on your own if you don’t invest in a suitable grow tent. A decent grow tent will help you acquire a greater yield.
Keep the following in consideration while choosing grow tents:
- Ventilation is important (good number of air pockets)
- Insulation is a term used to describe the process ( to prevent water leaks)
- Viewing windows and large entranceways
You may be wondering, “How big should a grow tent be for one cannabis plant?”
For one plant, I suggest a 24′′x24′′x48′′ grow tent. To put it another way, a 22-foot tent. A 24 foot tent is great if you intend on growing two plants. Finally, the 44 foot tent is required for four cannabis plants.
Now we aim to increase our yields as much as possible. We’ll develop two or four plants to do this. I don’t want you to have to go through this.
As a result, I’ve compiled a list of my personal favorites for various sorts of people.
Step 3: Controlling Humidity & Temperature
Mold may grow on buds if there is too much humidity or the temperature isn’t managed. That is the very last thing you want to happen.
You may simply use a dehumidifier to keep the growth environment from becoming overly humid. If you have a small growing area, it’s ideal for managing humidity.
The above-mentioned growth tents provide excellent ventilation. Our room, on the other hand, does not.
So, here’s how it goes.
The heat generated by the growth lights is confined within your room. It progressively raises the temperature in the room. As a consequence, you can experience an increase in humidity.
It is simple to construct your own ventilation system. In your developing tent, a modest exhaust fan should enough. Invest in a digital thermometer and keep track of the humidity and temperature on a daily basis.
With the lights on, the ideal daytime temperature is 70-80 °F (21-27 °C). At night, it’s 5-10 degrees colder (lights off).
You can keep track of the humidity by looking at the graph below.
| Stages of Development | Humidity |
| Cloning and seeding are two terms for the same thing. | 70% |
| Vegetative | 40-60% |
| Flowering | 40-50% |
| Week of the finals | 40-45% |
Maintaining the proper temperature throughout the winter might be difficult. As a result, it is preferable to get a heater as well as an air controller. If you’re utilizing grow tents, grow boxes, or grow bags, however, you should avoid using heaters.
Although many growers utilize heaters, I like to keep them out of my grow tent. If necessary, let it heat the whole space, but I don’t want any fire dangers. As a result, I utilize electric blankets everytime I do micro-growing tests.
So, here are some heating choices for you to consider:
In addition to this, consider insulating your home. It may help you save a significant amount of money on your power costs.
Pro Tip
If you’re having trouble keeping them in control, your ventilation isn’t enough. It’s a positive sign that you need to improve your fan base.
Here’s what I’d suggest. These fans are very silent.
Bonus! It won’t smell like cannabis in your room.
Step 4: Choose Grow Lights
You want to start growing plants inside. Plants, according to fundamental biology, need light. However, the proper quantity of plants under various LED wattages is a vital factor to consider.
So, now that you know how many plants you’ll need, let’s look at the finest grow lights. You’ll be OK if you get one of them.
Let’s take a closer look at these grow lights.
Why Should You Use a 315 W CMH/LEC?
I’ll tell you the truth. You can obtain the greatest output with an LEC rig. However, with LEC grow light, you’ll need a whole other configuration. Everything must be in place, from growth tents to exhaust fans. It also comes with high power costs and a high maintenance expense.
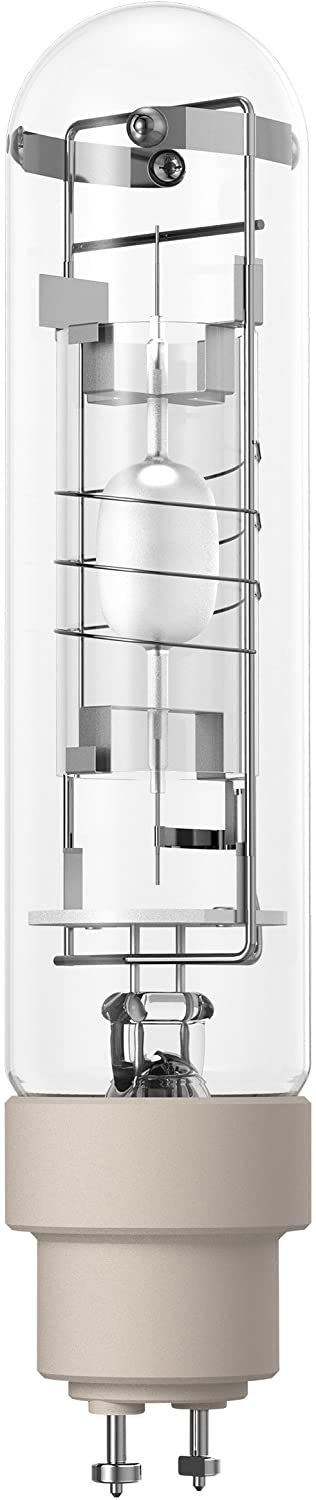
Using Eye Hortilux Ceramic, I was able to produce an average of 13.5 ounces. It’s ideal for a 3’x3′ growing area. However, the temperature in the room rose dramatically. To cope, it requires enough ventilation. But, hey, the 13.5-ounce yield is worth it.
Why Should You Use a 300 Watt LED Grow Light?
This is a popular choice among the locals. It’s long-lasting, adaptable, and the lighting can be adjusted. You won’t want to use anything else after you’ve tried this.
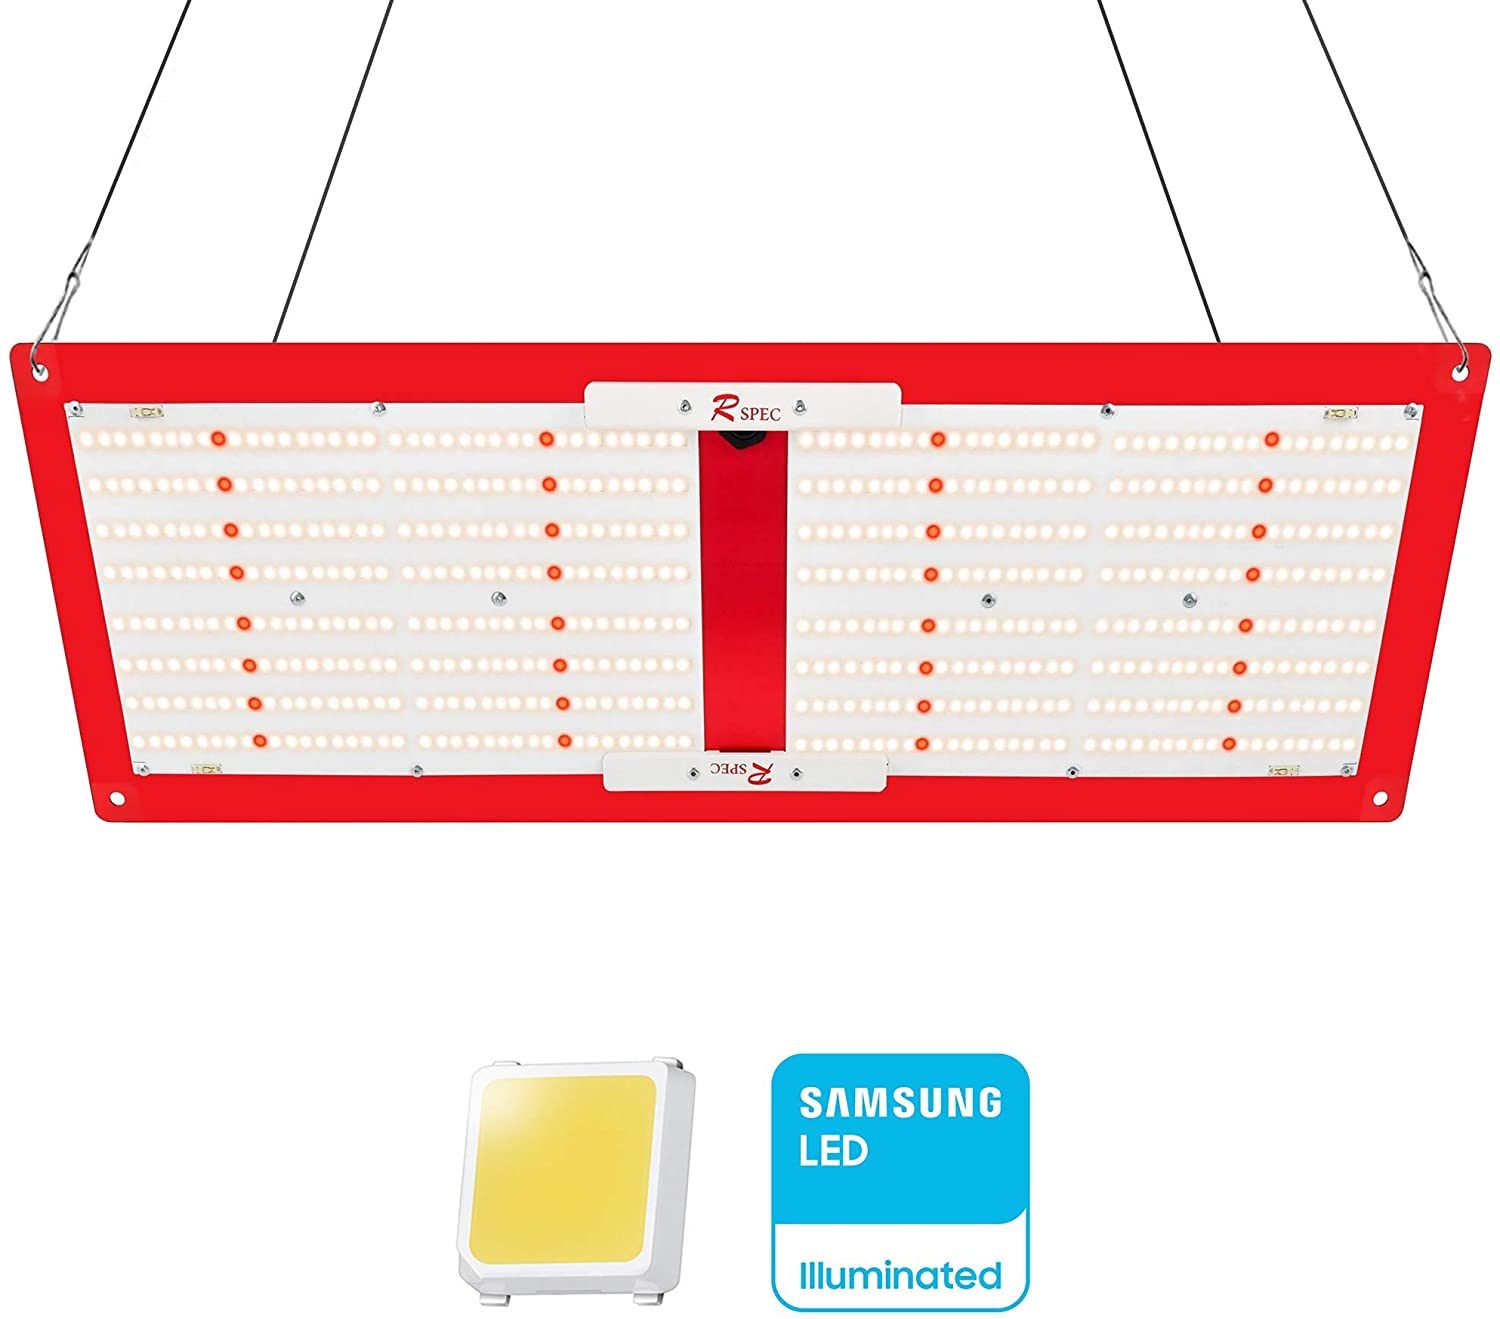
It’s ideal for a grow area of 2’x4′ or 3’x3′. The temperature in the room barely climbs a few degrees. The buds are very powerful at this location. Using the HLG 300L Rspec and guidelines, I was able to get a yield of 11.2 oz from three plants.
If you’re on a budget, the MAXSISUN PB4000 Grow Light will suffice. LED grow lights are a particular favorite of mine. It’s less expensive, has more working alternatives, and doesn’t get too hot.
Why Should You Use a 100 Watt LED Grow Light?
For a 2’x2′ grow room, 100 W LED grow lights are ideal. The room won’t become too hot with these grow lights. The temperature will be mild.
However, the fixture may get heated, but this is not a cause for concern. You should expect a yield of 1.5-3.5 ounces on average from them.
The buds may be a little airy, but they’re still strong.
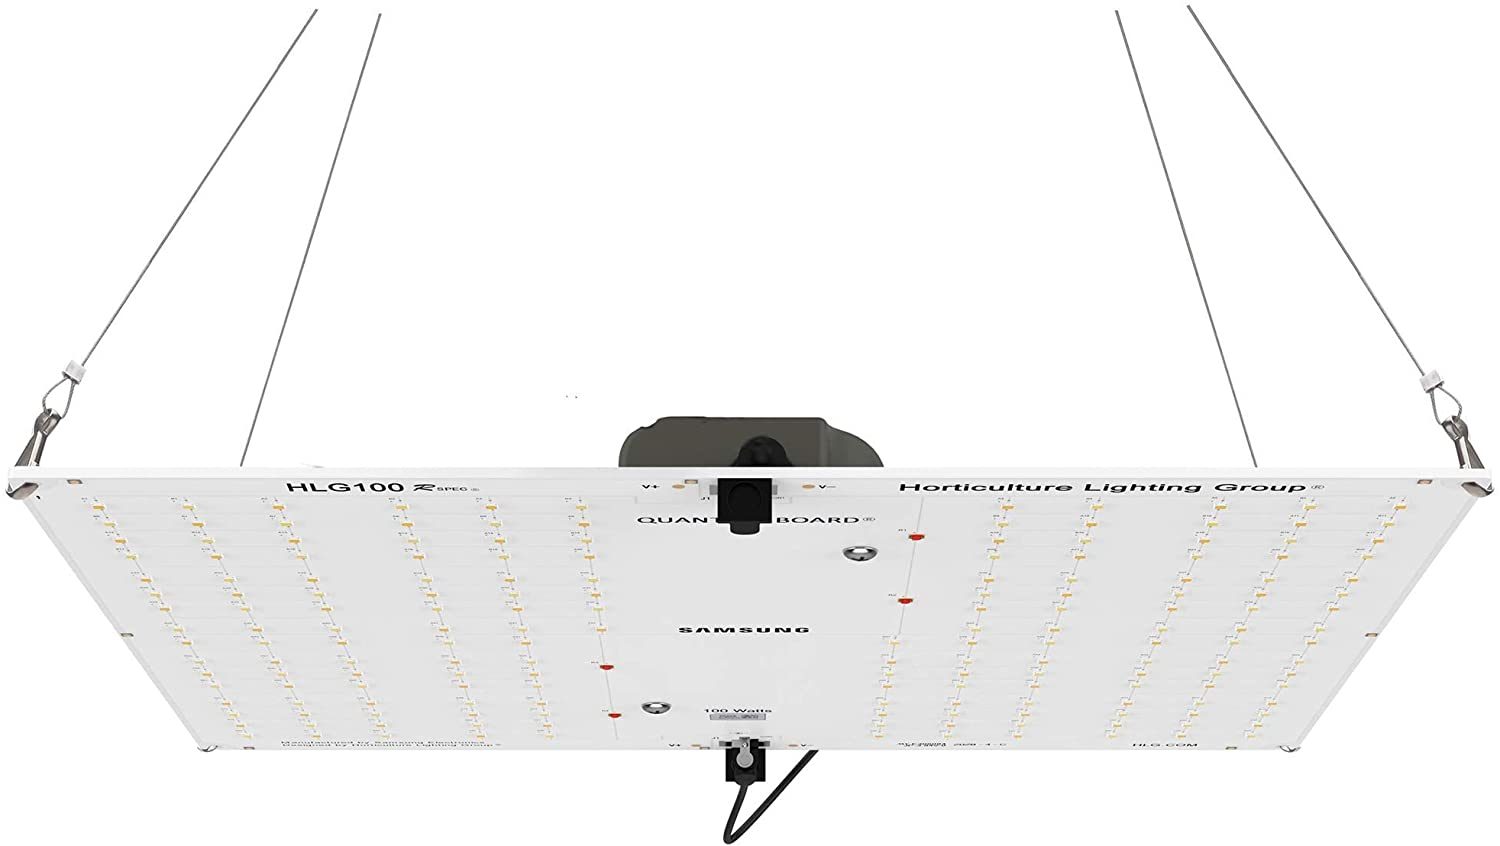
This is your go-to grow light if you’re just getting started. These are inexpensive, have little impact on power costs, and will get the job done.
Pro Tip
- We don’t want to use fluorescent grow lights since we want to get the most out of our plants. T5 fluorescent lights yield excellent, hefty buds. In terms of yield, however, it will be lower. As a result, go for LEDs, HPS, or LEC grow lights wherever possible. These are less expensive and perform better.
- Plant Lighting Distance – If your lights are too near to your plants, they will burn. Your yields will be reduced if the lights are too far apart. As a result, always check the package label or the instruction manual to determine the proper distance.
As a general guideline, a distance of 12-18 inches between the plants and the LEDs is acceptable.
- Light Coverage – It’s critical to keep track of how much your lights can illuminate. Always check that the lights are reaching the plant’s margins.
Adjust the angle of the lights if the plant margins are not being covered by light.
Step 5: During the Vegitative State, Cater Plants
As I previously said, the vegetative stage is when you begin to properly care for your plant. In this stage, your aim is to get your plant as large as possible.
During the blooming period, there isn’t much we can do to increase production. That is why you must complete all of the necessary preparations prior to the final step.
This means you should begin topping and shaping your plant at this time. Why?
We want the lighting, nutrients, and humidity to be evenly distributed throughout the plant. We’d want our plants to have thicker branches as well. There will be larger yields if there are more branches with more leaves. It’s as simple as that.
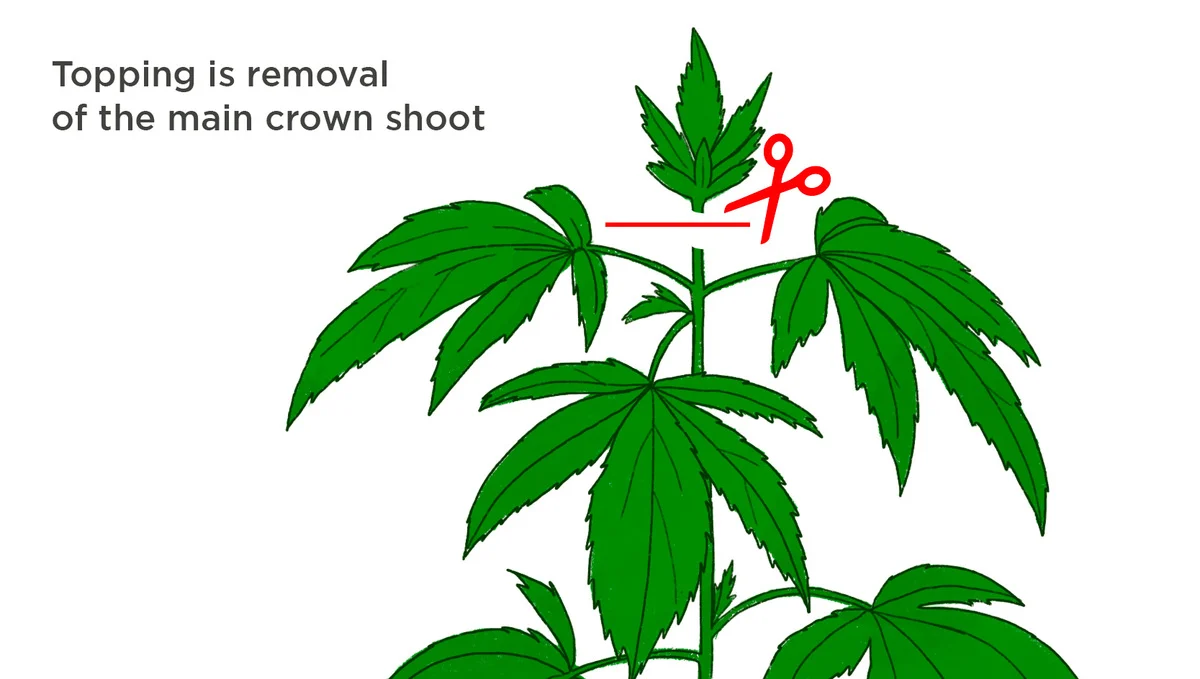
Topping
We want our plants to have a bushier appearance. Auxins are a kind of hormone found in cannabis. It causes them to grow straight up, giving them the appearance of Christmas trees.
As a result, we’d want to begin leveling the top. We’ll be able to spread auxins throughout the branches this manner.
Topping refers to removing the plant’s top layer. You’ll be slicing off the primary crown shoot, to be exact. It’s time to top your plant when it has about 4-5 pairs of fan leaves.
2fast4buds.com is the source of this information.
Allow your plant to grow a little more after you’ve chopped down the tops. Then go ahead and top it off again. More branches will result as a result of this.
By the way, don’t go overboard. During the veg stage, some individuals make the mistake of chopping off too many branches. A decent rule of thumb is to top it no more than 2-3 times.
As a result, your plant will begin to distribute all nutrients and energy evenly. Furthermore, the grow lights can effectively illuminate the whole plant surface.
Stress Reduction Training
Stress Reduction Training is just a way to bend or hold down the branches. We want the grow lights to hit every part of the plants. This will ensure more buds to the lower or darker sides of the plants.
To train my plants, I usually spread the branches out from the center. So that the smaller branches get more lights. This is called low Stress Reduction Training. In this method, you don’t have to use strings or ropes to spread the branches.
Now there are people out there who do high Stress Reduction Training. It’s also called kinking or super cropping. In that case, you will do whatever you can to spread the branches. Some use strings to pull down the branches. The plant tissues get damaged but it can self-repair those tissues. As a result, you will get stronger, thicker branches.
To get a similar effect, place a grow tent net on top. Strings may be replaced with a grow tent net, which is a better and safer alternative.
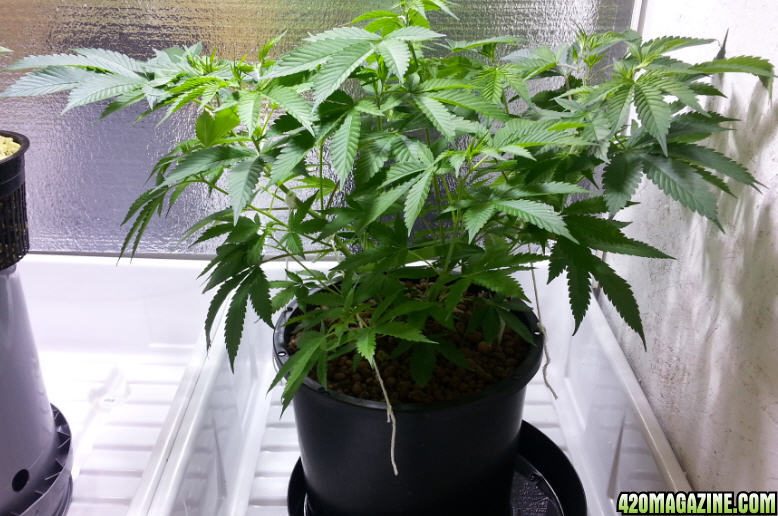
An example of a grow tent net in operation is shown below.
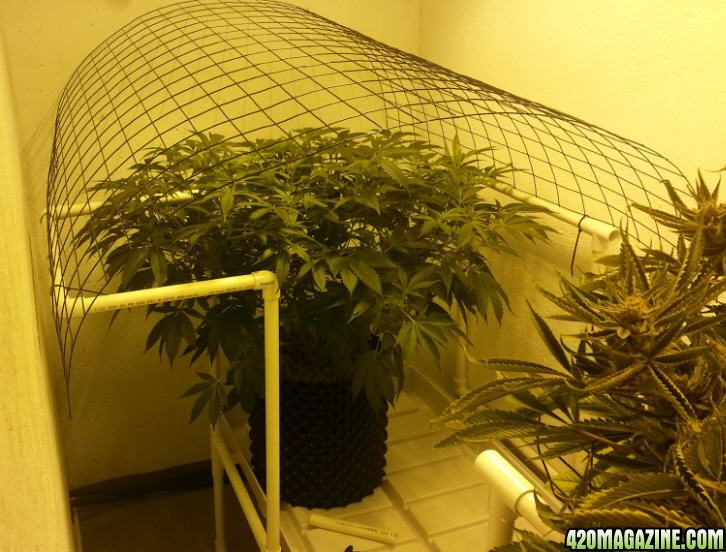
420Magazine.com is the source of this information.
The key objective, whether it’s LST or HST, is to stretch out the branches.
Here’s a great illustration of what I’m talking about.
Before
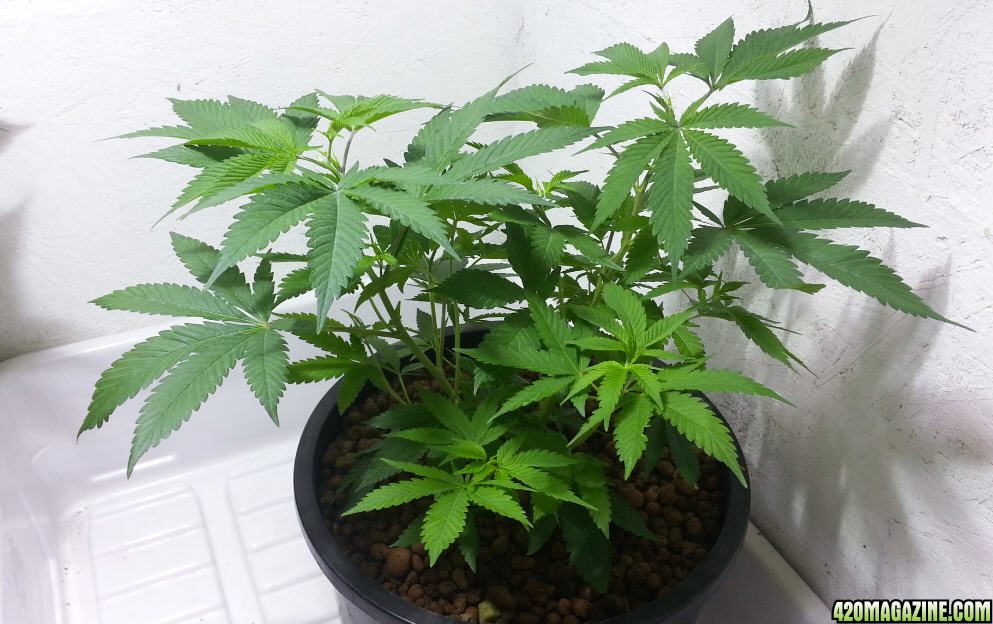
420Magazine.com is the source of this information.
During
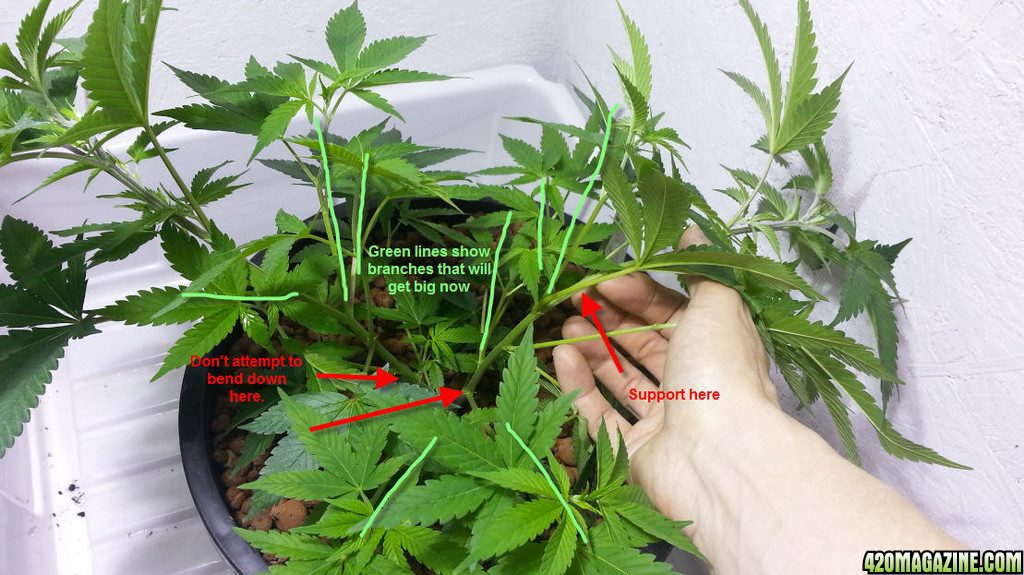
420Magazine.com is the source of this information.
After
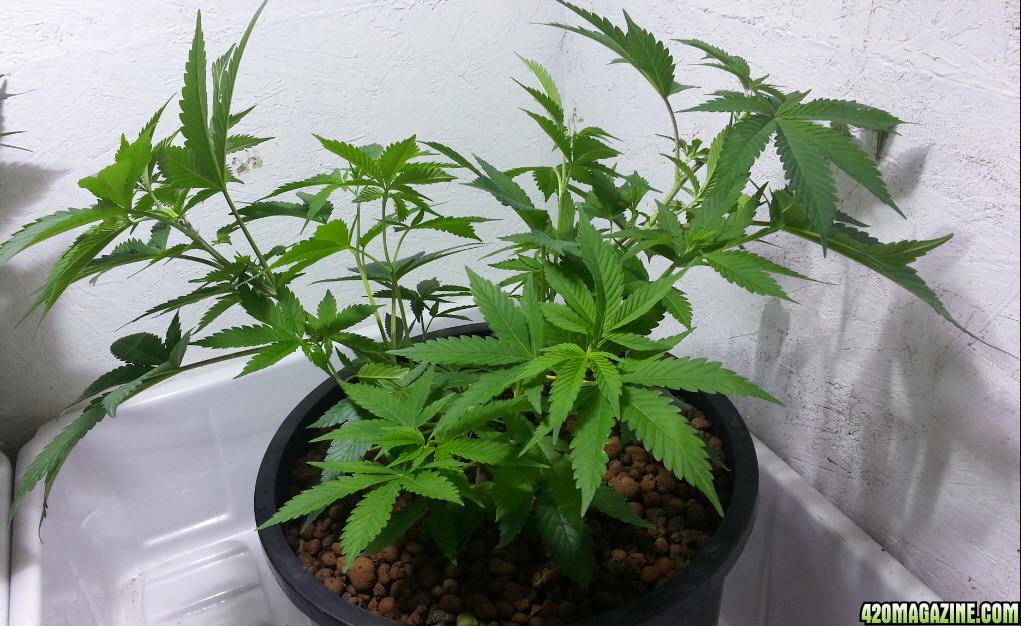
420Magazine.com is the source of this information.
The End Result
420Magazine.com is the source of this information.
Are you able to tell the difference? Branches and leaves are more widely spaced. This is what gives the brush life the structure we want.
Cannabis plants have a bouncy quality about them. As a result, no matter how hard you push them, they always bounce back. It’s for this reason that some individuals utilize kinking.
Bending
We’ve topped the plants thus far. It will help the plant to produce additional branches, allowing you to re-top it. To obtain additional branches, add a few more nodes and top it again.
The plant was then stretched out as evenly as possible. The lighting will be able to reach every area of the plant’s body this manner.
Now is the moment to bend or tie the plant down. You’ll need to bend the branches over 4-5″ at a time. Don’t push too hard on the middle stalk. Slowly work your way through the bending. After that, you may secure the branch to your pot to keep it in place. This is the definition of bending.
We want our plants to resemble shrubs once again. This is done to maintain the tree small and level out the branches. This will also provide adequate light for the side branches and main stalks.
Continue bending from this point until it’s a solid 3ft in diameter. Then, when the branches get taller, they may be topped. Keep doing this for another week, and your plant will be ready to blossom.
Pro Tip
One week before blossoming, don’t top or stress your plant. Plants have their own stages of development. Under specific circumstances, it reaches the blooming stage. You’re delaying the blossoming stage by straining. Why?
The reason for this is because the facility will be in “maintenance mode.” The plant enters this phase once we bend or topple it. That’s the most basic parallel I can think of.
To cut a long tale short, we’re just trying our best to get our plants ready for blossoming.
Providing the Correct Nutrients (Step 6)
By nutrients, we mean giving cannabis the proper quantity of fertilizers. During the vegetative and blooming periods, it’s critical for the plants to absorb enough nutrients.
There are three primary things we need to provide our plants. Nitrogen (N), Phosphorus (P), and Potassium (K) are the three elements (K). To calculate the dose, we utilize the NPK ratio.
When you’re in the vegetative stage,
Cannabis plants need a lot of nitrogen to grow. Nitrogen aids in the development of plants. The plant need additional nitrogen to cope with the higher burden as a result of repeated topping and bending.
To increase yields, we must be cautious about how much fertilizer we use. This graph will serve as a helpful reminder of the proper NPK ratio.
| Week | NPK Ratio |
| Week 1 | 2:1:2 |
| Week 7 | 10:5:7 |
| 14th week (Last week) | 1:1:1 |
In a nutshell, between weeks 2 and 13, you must increase your nitrogen intake. Particularly while topping and bending.
I understand how difficult it is to locate these specific NPK fertilizer ratios. I used the Dyna Gro 8 oz. for the first week. It’s not quite 2:1:2, but this one required adequate development at the time.
In week 14, I used Jessie Mae to finish off my plants’ NPK requirements.
During the blossoming process
You must quit fertilizing your plants with nitrogen. You must now begin boosting the phosphorus and potassium levels.
Now you’re probably thinking what kind of weed fertilizer is best.
Using organic fertilizer is preferable. Compost tea may be made and sprayed on the leaves. You may also mix the tea into the soil. It’s fine either way.
You may, however, choose for synthetic. I generally use a combination of tiger bloom and huge bloom. To acquire better outcomes, you must first comprehend the variations in components between tiger bloom and huge bloom.
Finally, remember to water your plants and maintain a healthy pH level. After all of your hard work, the last thing you need is to be watering your plants!
Summary
We’ve certainly covered a lot of ground. With so much information, it’s easy to lose track. So, using this checklist, I’ll summarize everything for you.
- Make a good, well-thought-out strategy.
- Choose the proper seeds.
- Choose a Plant Count
- Choose the Best Grow Tents
- Choose the appropriate grow lights for the amount of plants you’ve chosen.
- During the vegetative condition, feed the plants.
- Properly topping the plants
- Stress Reduction Training
- Bending
- supplying the necessary nutrition
FAQs
Is it possible to achieve a pound per plant indoors?
Yes. If all other things are equal, you should be able to obtain more than 13 oz from the “Wonder Woman” variety. It is dependent on a number of things. Lights, room temperature, plant quality, nutrients, and grooming are the factors to consider.
Is it possible to cultivate only one plant?
Yes. You can only cultivate one plant at a time. You can cultivate one plant with the help of a suitable grow tent and grow lights.
Is it true that topping increases yield?
Yes. It is true that topping increases yield. Because it enables the plants to spread out more. This allows the plant to produce more buds as it progresses through the blooming period. As a result, your yield will be greater.
For the best yield, how long should I veg?
It is suggested that you veg for two to twelve weeks. Some folks, however, prefer to employ the SOG approach and skip the veg step. However, it is an extreme case. It’s best to maintain the veg stage at 2 months if you’re using a traditional growing technique. This will result in a greater yield.
Last Thoughts
So there you have it. I’ve told you both my clean and nasty secrets.
You may now begin work on your own plantation. Hopefully, by following this instructions, you will be able to grow a plant that weighs more than 1 pound inside.
Leave a comment below if you have any other questions.
Until then, I wish you all the best in your gardening endeavors.
Related Tags
- pond plants
- unique house plants